Thursday, December 26, 2013

From Trash to Treasure-Aspen Blog Hop

Howdy and welcome to the Club Scrap Aspen Blog Hop...
I'm doing this post a little ahead of time so I'm not 100% sure where you hopped from but you can always head to Club Scrap Creates if you need some blog hop direction.

This month I was lucky enough to be asked to create some cards as the Guest Artist.  I was really honored to do it and tried to come up with a couple tricks and ideas for you.  One idea was to use the "leftovers" from the Embellishment Cut-Outs to create some accents for the cards.

So I used this...


And I cut them like this...

Now you can see they aren't all perfect, that's ok, I just worked with what I had, covered up any areas that were a little out-of -whack and I used them like this...

Such cute accents for something that usually would have ended up in the garbage!

AJ and MaryAnne were too content on their heated blanket with a Packers throw on top of it (that my mom made) and they didn't want to help out, but they did eat my leftover cut-out scraps...just to be sure nothing went to waste.


Merry Christmas and Happy Blog Hopping...I've really enjoying being involved with the hop this year and can't wait to see what next month brings!  Now it's time to head over to Tiare at iclassygirl.

Love, Janet, Leslie, AJ and MaryAnne

Wednesday, December 18, 2013

Holiday Health Update

Merry Christmas and Happy Holidays (covering all my bases here.)

I just wanted to post a brief update since I know it's much easier to put this here than to tell a bunch of folks specifics.

So the good news is that my right adrenal seems to be "woken" up and is functioning perfectly.  All my bloodwork came back as "normal" including my Cortisol, my Blood Sugar and even my liver levels that were a little off 6 weeks ago.  So this means I should be able to come off the steroids in the next few weeks, I can also come off of some of the other supplemental meds I was on.

I'm struggling a bit because I still just don't feel great.  I'm hoping it's just the end of the year stress of work stuff and the fact that while my levels are good I'm technically supposed to give it a year before I'm totally "cured".  I'm also STILL suffering with anal fissures as a result of lack of appetite and too much weight loss in a short period of time.  If you don't know what these are I pray you never, ever, ever find out.  (Unfun!) I also have a slight tremor in my right hand that has been acting up since an Adrenal Crisis on the 4th of July.  I'm hoping this also will eventually go away.  It's mostly only noticeable when I hand write something.

It's been a crazy road but I'm hoping to continue on the road to being "healthy" again!  I'm down 60 lbs with about 30 more to lose to get to what I feel like is my healthy/normal weight.  I'm hoping in the New Year I can get back to working out, more walking etc.

I just wanted to thank everyone so much for the prayers, cards, visits and well wishes.

Now back to your regularly scheduled blog...including the upcoming Aspen Blog Hop on Dec. 27th!!
 

Wednesday, November 27, 2013

"Catching Fire" and Ice Headbands

Good Morning and Welcome to the...

I got an idea for this month's project as soon as I saw the super cool 12" long stencil that came in the Club Scrap Fire and Ice November Kit.   So here is what you need so you can make one of these for yourself.


Step One-Go to Pinterest or Google and search "homemade headband" and then sew up a few.

NOT!!

I'm totally kidding, the best thing to do is go to Walgreens or Target or something and buy something like this...
Next notice the seams and stuff on the bands.
Twist the band around so the seam that was up and down through the middle is now on one side.
Next grab some kind of ball.  This is like a replacement for your head because you cannot make these while they are on your head.  Well you could try but that would be another blog post.  I grabbed a volleyball.
Note-yes I know the volleyball is on the toilet.  That is where it lives.  On top of the duct tape.  After dbf's divorce 11 years ago he decided he didn't want anything girly decorating the bathroom.  Now we have one toilet with a football and one with a volleyball.  It is helpful to always know where the duct tape is.  In fact the roll of tape can also help us here, so grab a roll of tape (I ended up using painter's tape.)

Next wrap your headband around your volleyball.

This is when the roll of tape is helpful because you can set the ball on top of the tape for stability.  Next pick the stencil you would like to use and tape it to the ball in the center of the headband (keeping in mind the seam should go in the back.)

Grab some paint and I used make-up sponges for the first try.
You should be working with something like this.  Of course having a cat helper is not necessary and might be messy.
When you are done remove the stencil but let the band stay on the ball for a bit to dry (again leaving it on the roll of tape is good so it doesn't roll around.)  My first band was a so-so attempt.  If you use too much paint it bleeds through the fabric leaving not as crisp of a design.
I also would now not recommend using a glitter-y paint.  Sounded like a good idea at the time (as she wipes glitter 2 days later off her face.)
So other things to try include...Markers.
Ink and a applicator
My original plan was to make a "Fire and Ice" headband duo so here they are!
The "Catching Fire" one ended up being my favorite and was made with a mix of 4 paints.  Eat your heart out Katniss.
Those who know me know I have had LONG hair for a LONG time.  I recently ended up chopping off most of the rest of it due to health reasons (a lot of it fell out over the course of the last year.)  Now that it is coming back in it's full, CURLY?, and out of control...so the headbands will come in handy!
(And yes the redish orangey crocs are mine.)

So whip yourself up some headbands!
Thanks for stopping by, your next stop on the hop is Lisa at carpe-memoria. and if you missed any of the great Fire and Ice projects just hop on back to Club Scrap Creates!


Tuesday, October 22, 2013

5.5 Month Post Adrenal Surgery Update

Does that sound like an exciting blog post?  I agree, pretty boring.  But for the folks keeping up with my Cushing's recovery I thought I would post a quick update.

Good News-
--My right adrenal is waking up and working at about half capacity.  I don't think it yet realizes that it needs to function for both of them since the left one is gone.  They are leaving my medication level alone for a few weeks to try to stabilize everything.

Bad News-
--I sort of no longer care about food.  Cooking it, looking at it, eating it.

Good News-
--I've lost 50 pounds!

Bad News-
--Apparently when you drop weight very quickly-this happens.
  

Luckily they are not bothering me too much and the doctor is taking a wait and see approach on them.  My liver levels are all out of whack but it's not too painful at this time.

I'm getting ready to go on vacation with my family.  It's MUCH needed but I must admit to being apprehensive about traveling.  While all my numbers are good I'm actually feeling worse than a few months ago (this is apparently normal.)  One of those it gets worse before it gets better things I guess?

But thanks for checking in, and you can thank me for not posting the actual images I found online when I Googled "gallstones".  

Love-Janet 

Wednesday, September 25, 2013

Home Tweet Home

Welcome Blog Hoppers!  Hope you made it here safely from Debby's Blog with your hands and arms inside the train and hats and glasses intact (old Disney joke there.)  Hopefully you are here for the September Club Scrap Blog Hop.  You can check out all the great crafts and fun goings on at the Club Scrap Creates Blog
The kit this month featured some wonderful paper and stamps.  I didn't want to cut into that paper quite yet though and I haven't cut or mounted my stamps.  I know, I know.  Where does the time go???  But also this month they sent us a little embossing folder with birds on a wire on it.  I have a couple of these and I have had and I had no idea what to do with them.  Finally after a suggestion on the Community Boards at Club Scrap someone suggested I get one of these...
Michael's with coupon only about $16.  So I read the directions, kind of and used Tricia's idea from the Scrap Rap and I cut a piece of paper to match the size of the folder.
I then inked the folder with Adirondack "Name that Color" (CS needs a light blue ink-just saying...) and ended up with this...on my first try!
Since I already had in mind a bit what I wanted to do, I inked the folder most of the way down to create a "sky."  Next I tore a piece of the green Take Wing HPOP paper to make a grassy bottom to the panel.  Make sure you tear a piece tall enough to go to the blue section (don't be like me and waste paper.)
So next try to find a house stamp (or trees or something that goes with sky and grass right?)  I love these ones from the In The Neighborhood special collection...
Stamp image (this is onto Tribal yellowish paper) and then color away.  Don't you love coloring?  It's a bit like therapy...so color it and then find something else to add to the card but forget to take a picture til you are done with the panel and waaaa laaaa...
Dang isn't that so cute?  It was a moment of pure genius when I changed the little sign from Home Sweet Home to Home "Tweet" Home!  So then I mounted the panel on the Take Wing Red and some Brown from Tribal and stuck it on a card and here ya go!
Here's a little up close of my birdies...
I felt pretty good for trying something new and getting a new little machine for not too much money.  Now to find more of those embossing folders...

Thanks so much for checking out my project this month.  The Take Wing kit is really one of my favorites in a long time, the quotes alone are worth the price of admission!  

So when you are ready--secure your loose items, take small children by the hand and head on over to Tiare's Blog.  Have a crafty day!


Thursday, September 5, 2013

Wake Up Little Susie...

Ok I have no clue what my right adrenal gland's name should be but today in honor of her starting to perk up...we will call her Susie.  As in Wake up Little Susie...now the rest of you can sing this all day.  (You're welcome.)

Alrighty, welcome back for a long awaited (or not) health update.  Had a visit with the endocrinologist today after blood work on Tuesday of this week.  The good news is that my Cortisol level is approx. 4.  Normal is around 9-15 with some people topping out at higher (mine used to be 30+).  4 is much better than 0 which is what it was 2 months ago.  This means that my remaining adrenal gland is starting to "wake up". 

In the meantime though I have been actually feeling worse since decreasing my hydrocortisone two and a half weeks ago to 10mg (from 13).  Work, both physical and metal, drain me to the point of dizziness and confusion. She said it was probably a combination of too low of a dose of the hydro plus some pretty cruddy nutrition blood work feedback in other areas.  Low iron, low protein, low blood sugar-it is sort of a bad merry go-round because I feel bad so I don't eat, so I don't have enough good nutrition in my body and then I feel worse.   So...some more vitamins, possibly some supplements (including B12) and try to eat a little better or do some protein shakes (esp if I am trying to exercise.)  She added that some of the other "weird" symptoms I'm currently having, like sore feet and numb hands-could be vitamin deficiencies.  She is also keeping me on the prescription potassium.

So I'm upping my hydrocortisone for the next couple weeks, trying to eat a little more and a little more balanced.  My blood pressure is perfect and I am off of all of my blood pressure medication. 

I'm down 30+ pounds which is great but some areas are still acting stubborn-bra shopping today was like trying to wrangle two toddlers.  Why please are big bras so ugly?

Ok...back to topic.  Thanks everyone for the continued thoughts, prayers, messages, phone calls, cards etc.  I'm on my way to being a normal person again.  Well I don't think I was ever normal but I'm enjoying figuring out who I really am again! 

Wednesday, August 28, 2013

Light the Night-Tribal Style!


Howdy folks and welcome to the Club Scrap "Tribal" Blog Hop!  If you just left Debby's blog then you are in the right place.  If you popped on by from Facebook or my regular blog updates you are also in the right place.  If you just stumbled upon this post then you are late and you better head over to Club Scrap Creates to see a list of all of the bloggers participating today.

Now onto the good stuff.  I've been a member of Club Scrap in one way or another since 1999.  This month's kit is my favorite.  That's saying a lot huh?  I wanted to make something neat-o this month but I sort of ran out of time.  You know how it's one day before a deadline and you want to put ten hours into something and you only have 70 minutes?  Well that's what happened yesterday.

Luckily I had one of these from the March 2007 Rhapsody Club Stamp Kit-
Now I know what you are thinking, you are thinking..."but Janet I don't have one of those!!"  Luckily for you they are available online.  Google them.  Buy them in a 6 pack, make them for teacher's gifts!

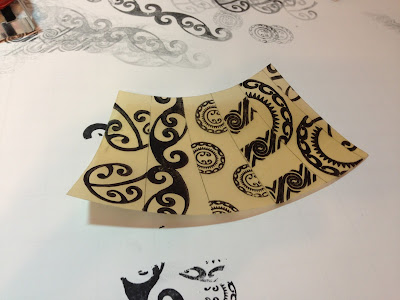
So I decided I wanted to "Tribalize" my nightlight.  It was pretty easy.  I took it out of the package (duh) and then peeled off the paper that is on the front of the shade (carefully.)  Then trace the paper onto the piece you would like to use (this is Autumn Splendor Gold Translucent).  I recommend a translucent or text weight paper so the light can shine through more easily.  But "it's your own darn light."  You only need about 1/2 of a sheet of 8 1/2 by 11 paper (unless you trace badly and screw up-then you need the whole piece.)

Cut out your traced paper and then mark it-the directions I had said mark every 3/4" inch around the top and 1 3/8" around the bottom then connect the lines like this...
You might want to start in the middle so yours doesn't look a little wonky like mine does but really in the end it doesn't end up mattering so...next step...grab some stamps (I used the Tribal Unmounteds) and some black ink, if you used translucent paper I would advise something like the CS Black India ink.  Mask each section and start stamping.
I heat set each section before I moved to the next one.
AJ approves of my stamp choice.  When you are done you have something like this.
Now the directions say to cut 1/8" strips of paper to go between each section but I was tired and mis-read that and cut 1/4" strips from Tribal POPs instead.
Stick them on there (I used my tape gun, might have been better with glue but remember, I was in a hurry.)  Cut the ends off that hang past the paper then carefully wrap it back onto the front of the lamp.
Next grab another color of POPs and cut strips to wrap around the sides and top of the lamp.  It says 1/4" but that's not big enough (arg) so just cut them wider than the white part of the lamp.  (This isn't rocket science-you are decorating a pre-made light?)  The top one is a little tight, don't do like me.  You might want to wrap your strip gently around to train it.  I cut mine into pieces and stuck um down.  It's a little jacked up-but it's ok.
Finally grab some fiber of your choice-preferably something that has dangling things on the bottom and stick it to the bottom of the light with some glue lines.  Finally find a small dark bathroom and plug it in...

Wa-laaaaaaaaaaaa!  Pretty spiffy huh?  I like all the Tribal stuff so I have a feeling you'll be seeing a lot of Tribal stamps from me soon!
Thanks for stopping in and have fun on the rest of your blog hop today-next up is Tiare at iclassy girl.

Wednesday, July 31, 2013

Hopping through Wisteria aka Feeling Inadequate

Welcome blog hoppers to the Club Scrap July Wisteria Blog Hop (what a mouthful!)
So it's not a secret to many folks that I'm just not a flowery person.  I'm just not real into girly kinds of things.  So a floral themed kit was going to be a stretch for my creative side.  Give me a monster truck themed kit or maybe a hot dog themed kit and I'd be good to go.  But flowers?

I was feeling slightly inspired by a card I found on Pinterest that had a cut out side-of course now I can't find the card or the link so I can't show you what it's SUPPOSED to look like.  But here is how mine turned out...

It's not exactly a work of art but the process was easy so here we go...

Pick out three pieces of paper, 3 ea. 8 1/2 by 11 sheets are perfect. (Or one 8 1/2 x 11 and two smaller pieces of scraps is fine.)
This is DIY Light Brown and kind of a creamy white and that is the backside of a purple print from Tiny Treasures (oldies but goodies as usual.)

Fold the paper you want as your card base in half and then trim and layer the other two pieces something like this (where they all butt up against the right hand side where the card opens.)
Don't stick the front panel on yet, just make sure it is the size you would like.  Then start stamping.  This is some Wisteria UM stamps along with Colorbox Chalk Wisteria ink (and a brown marker for the stem/branch.)


It is at this stage that you might go through several drafts.  You might be a cruddy stamper and you are lucky you have about 10 sheets of the TT light purple cause you just can't get the stamping done right...but when you are slightly happy with the results then start kicking it up a bit.
I added some CS Mahogany ink with the stencil, what is that anyways, like a fence thing?  Whatever it is, add it on there with the branches sort of going into it?  Then some vines from the UM stamps with the CS Moss ink.  I still wasn't really happy with it so I got out the Vivid Lavender ink and did this...
Ah, getting better.  So next get your card base and stamp the inside right hand side of the card like this...
Then you stick everything down and you cut out along the right hand side through all three sheets of paper with some scissors so the vines show through to the front.
Ta-da!!

You know how sometimes when you make something it just still doesn't quite end up like the picture you saw?  That's how I felt when I was done.  We have some fantastic bloggers and crafters with us today and sometimes my work feels very inadequate.  But then I thought about how happy my grandmother (who is in the process of moving to an independent living apartment from her nice house) would be to get this card-then I felt better.

Sorry no cat helpers today ;)  Thanks again for stopping by.  The next stop on our Hop is with Tiare over at iclassygirl As always if you have started in the middle and want to start from the top feel free to stop by Club Scrap Creates for a list of all the Blog Hoppers today!  http://clubscrapcreates.blogspot.com