Wednesday, January 28, 2015

One Month Late...Idea Stealing!

Howdy Blog Hoppers and Welcome to the...Constellations Blog Hop!
We have swapped up the order for the hop this month so in case you're confused (admit it, you're confused aren't you?)  Feel free to hop on back to The Club Scrap Blog.

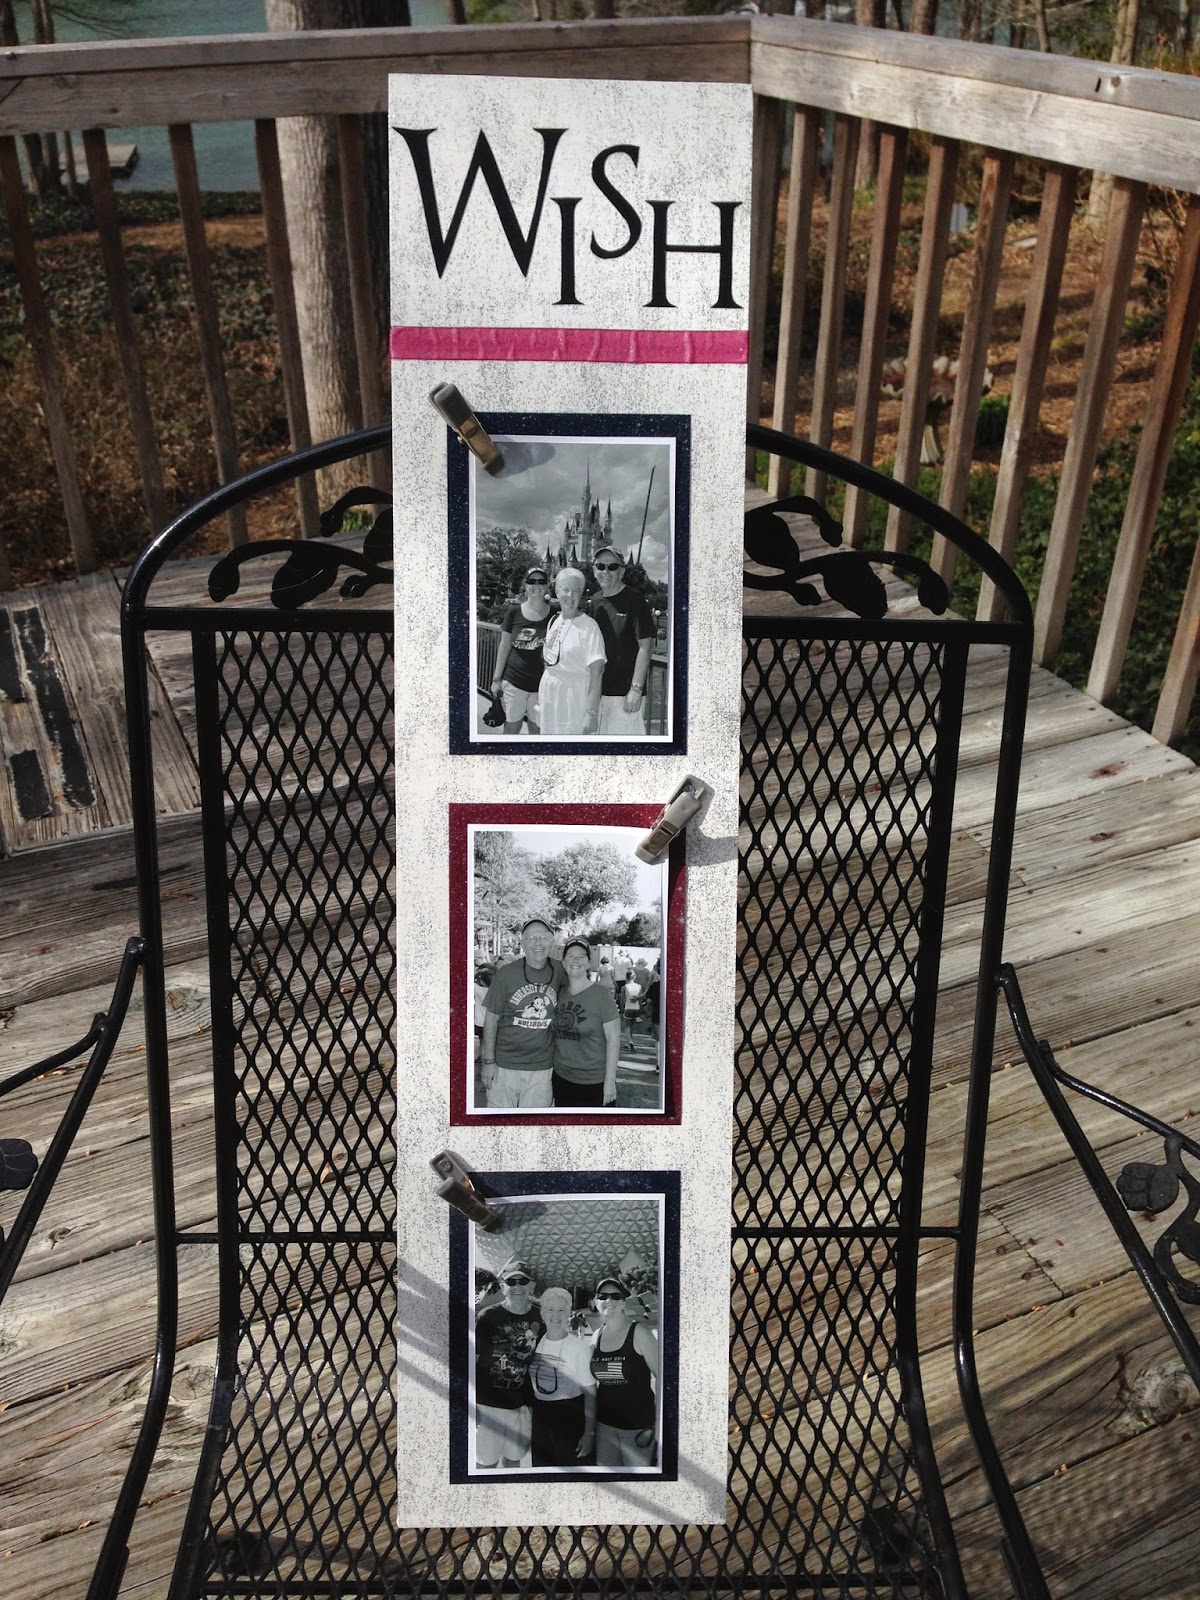
So in December I went to a little local craft show and saw the cutest idea for a project.  I planned on stealing borrowing it for the Reunion Blog Hop...except I got busy.  You know how December is right?  Cray-cray!  So one month later I adapted my original idea for the Constellations Kit and came up with a little something like this...
It's a wooden wall hanging with clips so you can change out the photos whenever you want to.  In the little booth I saw they had them going both vertically and horizontally in all different shapes and sizes and colors.  I saw kids themes, sporting themes, you name it!  So here are the easy steps you can take if you want to make one for your very own!!

Step One-Buy some wood.  I ended up with a 1"x8" 8 ft long from our local Home Depot.  I had them cut it in half at the store (this makes it easier for transporting.)  I actually chose sort of a mid-grade wood.  It is worth it to have as few "knot" holes as possible.

Step Two-Lay out your idea to see the final size your wood should be.  Considering my work table currently looks like this...
I decided to lay mine out on the floor.  You aren't really having to go for perfection here just a general idea.  I used three 5x7 scraps of paper as a guide and left spacing for the clips and the stencil letters and then I made a pencil line so I would know where it needed to be cut.
Step Three-Find someone handy with power tools.  I know, I could have done this myself but sometimes it is ok to ask for help.  Leslie said to be sure to score your cutting line on the top side with a box cutter, this assures you will have a clean cut.  If you don't do this you might just need to do a little sanding.  No biggie.
Step Four-Paint your wood.  Try to find a cat free area and protect it with something.  This old plastic tablecloth works nicely.
I used three coats of white acrylic paint to cover and then I added a layer of silvery glitter acrylic paint as well.
Step Five-Fix up your decorations.  I cut 3 ea. mattes of 5x7 Constellations paper (the 12x12 Navy star print and the 8 1/2 x 11 burgundy star print.)  I also used the stencil to draw and then cut out my WISH letters.  It helps if you draw your pencil lines on the back side of the paper you want to use (flipping the stencil backwards.)
Step Six-Put it all together!  I used Club Scrap bookbinding glue to carefully glue down my 5x7 mattes, my WISH letters and my ribbon.  Using the grid ruler here is super helpful to make sure you keep even spacing between your mattes.
Step Seven (optional)-I went ahead and added two layers of mod podge over my entire project.  It really helped everything stay down and in place.  Both my ribbon and my mattes got a little "bubbly" in this process.  Luckily on the mattes it doesn't matter because they will be covered with the photos.  The ribbon?  Well it just has a little more character now.

Step Eight-Attach your clips.  Again there were power tools involved here but I don't think there would have to be.  I saw different clips that could be glued down, nailed down or even magnetic.  These grey ones came again from Home Depot.

The final step involved me hurriedly getting a few photos printed, racing to pick them up and adding them to my project with the clips so I had something neat-o to show you all today!

Ta-da!

I hope you like it (if you buy a whole piece of wood you'll have plenty to make two!)  Thanks for joining me, Leslie and AJ the cat as we hopped today.  Next stop is Ink Stains with Roni!


Wednesday, November 26, 2014

10 Steps for a Blog Hop Project

Howdy folks and welcome to the Club Scrap November Lake Blog Hop...
If you'd like to start at the beginning of the hop at any time (after you read mine of course) please just hop yourself back to Club Scrap Creates for a full list of what we have for you today.

Today I'd like to give you a simple, easy to follow set of 10 steps for creating the perfect Blog Hop Project from your Lakes kit (which is so pretty isn't it?)
Since I live on a lake I had lots of great ideas all month about what to do with my kit (or you would think that wouldn't you?)!
The most important thing when figuring out what you are going to make is the planning.  I like making a to-do list.  So...

Step #1-Make a to-Do List that includes your Blog Hop Project. (Look how cute, it's even in kit colors!)

Step #2-Go shopping for any extra supplies you might need.  Don't get distracted.
Oh Look!!  Frozen fabric!!

Step #3-Spend lots of spare time working on your project.  Again, don't let yourself get distracted by other projects, hobbies or tasks.
This one was from the devil I think.

Step #4-When it is approx. 2 days before the project is due clean off your workspace.

Step #5-Make sure you eat a healthy lunch to prepare you for an afternoon of project making.


Step #6-Get to work.
Wait a minute.  Who took that picture.  I was working on my project.  Really.  Ok well if you need a nap it might help get the creative juices flowing.  Or you might just want to spend the day under the electric throw watching football.

Step #7-On the day before you need to post your blog, send any photos off to be printed.  Go pick them up.  Run by the drugstore, grocery store, library and any other end of the month errands you need to take care of.  Do laundry.  Pack for an out of town trip.  Pay work bills, pay personal bills, make dinner.  Then get to work for real on your project because you are running out of time.

Step #8-Clear any animals, children or husbands off your crafting space.

Step #9-Cut out the only sheet of unmounted stamps you haven't already prepped because it is the one that has the stamp you want to use on it.  Rub stamps with Mount-It.  Let dry.  Eat dinner.  Have hotly debated conversation about the state of the world.  Wash dishes.

Step #10-Complete Project.
Face it, you didn't think I was going to actually get there did you?  Me either.  But I did.  Oddly I ended up with a picture from a spur of the moment trip to Lake Michigan with my Mom and Dad instead of a picture from home.


Supplies Used-
3 Sheets of Lakes Paper plus POPs.
Seaside Cut Out
Mosaic Twist Tiles
Lakes Embellishments
Paper Clip from my stash.
Safety pin from Textiles and Notions
Ocean and Spruce Club Scrap Ink
Lake UM Stamp
Oopsie Daisy Splatter Stamp

I hope you enjoyed this simple list for creating a super duper Blog Hop Project.  We are so worn out we need naps!


Hop on over to Tiare's Blog for your next stop on this hop!

Happy Thanksgiving!!


Wednesday, October 29, 2014

Club Scrap's Homestead Meets Darius Rucker

Howdy Club Scrappers and Friends,

Howdy seems especially appropriate for this month's kit "Homestead"!  Thanks for stoppin by for the October Blog Hop.

(At any time if you want to start at the beginning of the hop just stop by The Club Scrap Blog.)

So this month I made something for your enjoyment...yup, pick your jaw right up off the floor because I actually made something and I even used some of the actual Homestead kit items!  Shocked aren't you?  I felt the kit was super great for my redneck Southern down home personality!

So to start I need to get you in the mood for this little card I whipped up.  Are you familiar with Darius Rucker?  Former front man for Hootie and the Blowfish turned county music superstar.  He sings a fun little ditty called "Wagon Wheel" and if you haven't heard it or want to hear it again just click here!  (The video features back-up singing by Lady Antebellum as well as some appearances from some of my favorite rednecks from Duck Dynasty!)  Now that you've heard it feel free to sing and hum it for hours, all day, for days...you're welcome!

I decided that with the Rockin, rocking chair stamp and the Wagon Wheel stamps (all from the Unmounted stamp sets) that I'd make a special Wagon Wheel card for my mom (dear Mom, I was going to mail this to you before the blog came out but I forgot so act surprised when it comes!)

I wanted a card with a pull-out wagon wheel on the top.  It's kinda hard to explain so I'll just walk you through it.

Step 1 (for me)-Pick an envelope you already have and size your card to it.  Try to figure out how big your card needs to be.  You might want to sketch it out, there might be multiple drafts.  I decided to make a "pocket card" but since my envelope was longer than 6" I had to use two pieces of paper to make it.  I have included this helpful diagram.
Ok well that sort of didn't work out right.  So here is a bit of a guideline.  Measure envelope and cut a piece of solid paper the exact size you want your card.  This will be the back of your pocket.  Cut another piece of paper to be 1" wider across (1/2" for either side) and 1/2" longer than you want your finished card.  This is the pocket front.  (But don't actually do this yet because you might need to adjust, see below NOTE)  You are totally following this so far right?

Step 2.-Score the card front at 1/2" from each side and 1/2" from the bottom.  I needed some help with this step, obviously.
Step 3.-Draw and pencil line across the bottom corners of the pocket and cut along the hashed lines.
Step 4.-Fold in along the score lines to make a pocket and use some kind of fairly decent adhesive on the folded flaps to stick your back cover onto your pocket.  (I might use 1" wide flaps next time.)

Step 5-I stamped the wagon wheel pull out on a scrap paper and cut it out to determine how large I needed the inside page.  (NOTE-After doing this I realized if the inside page was the same size as the pocket and you have a rounded wagon wheel on the top that the entire card won't fit in the envelope-don't be me.  I trimmed down the entire pocket by about an inch to make the wheel fit into the envelope.)
Step 6-After cutting out the inside pull out panel I went about decorating all my pieces.  I used the splatter stamp from the Oopsie Daisy set to add some background to the pocket and back piece.

I also stamped, embossed and then fancy cut out the large Wagon Wheel stamp.

I stamped the front of the card with the Rocking Chair and used the UM Expressions font for my "Rock Me Momma" sentiment.
Step 7.-Stick everything down and find a nice picturesque place to photo your finished card!

And here is what it looks like when you slide the inside panel inside the pocket!

Nifty huh?  I'm so glad I was able to exactly show you how to make this neat card...sort of.  Now I'm sure there are lots of great formulas and diagrams for making pocket pages, next time I might consult one. =) 

Thanks from me and AJ and MaryAnne for stopping by and have fun hopping along to your next stop at  Tiare Smith's Blog.


Wednesday, September 24, 2014

Organization-The Blueprint for Success!

Howdy folks and welcome to the blog hop!  If you get lost along the way feel free to drop by The Club Scrap Blog to catch up on anything you might have missed.
I've been on vacation and am playing catch up here at home and at work but I couldn't miss out on the blog hop so keep your hands and arms inside the blog at all times.  There will possibly be eating, drinking and flash photography on the blog today, but please no smoking!  (Sorry I told you I'd been on vacation?)

Instead of a fancy project (come on you didn't think I would actually make something did you??) I'd like to take a few moments to discuss something near and dear to all of our hearts...organization in the crafting room.  I know I know, you probably don't need any help with this right?

 Your room doesn't look like this?

You don't have buckets of unfinished junk everywhere like this do you?

I don't know about you but my supplies are busting at the seams so I wanted to go over a couple ideas for organization because...


Let's start with kits.  I keep my kits in 12x12 plastic folders.  Each folder easily holds one regular kit, one lite kit and one stamp kit.  Not that I would know but it might also hold an extra full paper pack from the regular kit as well.  As you can see by one of the above photos I had run out of space for the actual folders so I purchased some new shelving units to go in the spare bedroom (aka the cat's room.)  I purchased a Kallax shelving unit from IKEA.  These used to be called XPEDIT units and are basically the same inside dimensions.  They come in a 1x4, 2x4, 4x4 and 5x5 cube size.  In this situation I ended up with a 4x4 cube (around $80) which I was able to assemble myself.  Just a note, try to put it together in the room you want to use it in.


Have someone help you stand it up as they are sturdy (aka heavy.)  Also PLEASE anchor it to the wall.  I don't need anyone coming back to me and saying that they had one fall on them and crush an important body part.  Here is mine finished and I purchased 3 ea $5 "basket" inserts.  (I wish I had bought a couple more.)


Please excuse the litter box, I told you it was the cat's room!  So now you have your finished new storage area.

Each of the cubes can hold around 12-14 folders (even more if you don't have all three monthly kits in each folder.)  So that means each cube basically holds a year of kits, including a special release or two.


I also have some of my kits in older wire cube storage which I do still use but if you go this route make sure you zip-tie every SINGLE connection.  I'm not kidding here.  You don't want to know what it looks or sounds like to have one of these puppies collapse in the middle of the night dumping about 8 years worth of kits on the ground.  Not that I would know.


So now you have organized and packed up all your kits.  Now let's discuss these little babies...


Call em POPs, call em HPOPs, we love em!  And We (I'm using the royal We here) have a TON of them.  I started to do some calculating but once I hit 300 POPs I quit counting.  So I have a couple of suggestions for you.  First off you can use an insert in one of your new cubes to hold a good many of them like this.  I keep my most recent ones here for easy access.


I also like the old over the door shoe organizers for some of my older POPs which I store at another house.  (yeah I know I have issues)


My current craft loft doesn't have any doors though so it's a tough spot for storage.  I also don't have a closet but if you do you can use these closet shoe holders for POPs as well (including the older strip type that we used to have.)


Finally I have a good many POPs in some storage holders called "Shoes Under"  Now these work well under the bed for storage but are fairly hard to get out and carry to the other room to use.  I actually have to get help to carry one around because they are "floppy" not sturdy.


So now you have a place for your POPs!  Next up we have the Greetings to Go.  I actually just started trimming, scoring, folding my GTG and storing them in another one of the cubes.  Ok so I scored and folded one of them.  The rest are a work in progress.


Here is my new cube system mostly filled up in the spare room...I left a couple non-craft cubes for things like cat supplies, and our poker stash.


I also use a similar 2x4 cube upstairs to store albums and ALSB pages waiting for photos.


I hope some of these ideas will help you save your craft space, I know I have a hard time creating when I'm surrounded by chaos and...

Looks like a have a couple cubes left empty, time to go buy some more supplies!!  I hope you enjoyed this little blog today and before I forget...

AJ approves of this month's kit!

Hop on over to Tiare's Blog for the next stop today and everybody keep on hoarding...I mean...crafting!!